Company’s VPN using Cisco VPN, for client we are using Cisco AnyConnect Secure Client. It looks like this:
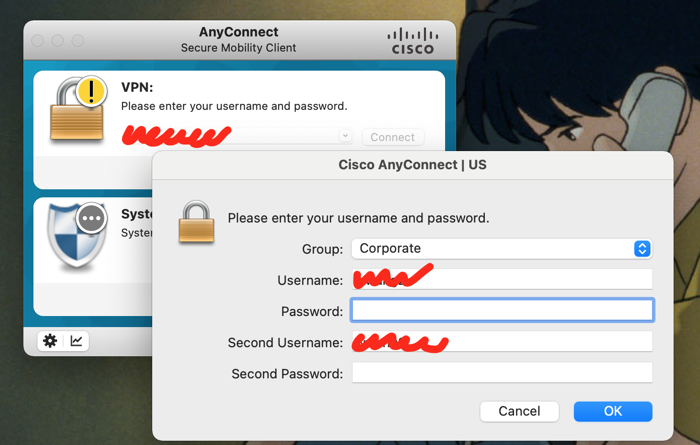
You have to fill in VPN URL, then provide username, password, second username and second password. The second password is a Token you need get from SecurId App, so you need open your phone at the same time. It’s not a big issue, if you just need login in the morning.
However, after switching to AWS, VPN connecting becoming a nightmare ! Frist, not only one VPN anymore, and then these different VPNs can access to different resources … When you have to switch frequently between them … Ahhhhhh
Must find a way to reduce the pain, Lucky not only I’m thinking in this way. Thanks for all the colleagues’s amazing help.
BTW, I’m working on MacOS. And this article is based on Cisco AnyConnect Version 4.
Idea one: Cisco AnyConnect Profile
First of first, learned from @Neil, we can create a Profile to fix the configuration for VPN URL. We need create a XML file, and put it under cisco foler:
/opt/cisco/anyconnect/profile
New version location changed to:
/opt/cisco/secureclient/vpn/profile
with XML file as:
<?xml version="1.0" encoding="UTF-8"?>
<AnyConnectProfile xmlns="http://schemas.xmlsoap.org/encoding/">
<ServerList>
     <HostEntry>
          <HostName>VPN1</HostName>
          <HostAddress>xxx.xxx.xxx</HostAddress>
     </HostEntry>
</ServerList>
</AnyConnectProfile>
Now you dont need fill in VPN URL anymore, life is easier, but how about those username and password ?
Idea Two: OpenConnect Solution
@Felix mentioned we can try connect with OpenConnect from CLI. That’s really a good idea! To do this we need 2 tools: stoken for RSA SecurID Token, and OpenConnect as VPN client.
2.1 install OpenConnect & stoken
brew install openconnect stoken
2.2 Import stoken
We need import a token from a raw string or an “sdtid” XML file:
stoken import --token com.rsa.securid://ctf?ctfData=2000727046 ...
stoken import --file mytoken.sdtid
2.3 now you should get Token from CLI
$ stoken
86791598
2.4 Connect VPN with OpenConnect
#!/bin/sh

# read
VPN_ZONE=$1
VPN_ZONE=$(echo "$VPN_ZONE" | tr '[:upper:]' '[:lower:]')

USERNAME="xxx"
PASSWORD="xxx"
PIN="xxx"

if [[ -n $VPN_ZONE && "$VPN_ZONE" = "vpn1" ]]; then
  VPN_SERVER="xxx.xxx.xxx"
fi

sudo openconnect --non-inter --authgroup=Corporate --form-entry=main:username="$USERNAME" --form-entry=main:password="$PASSWORD" \
--form-entry=main:secondary_username="$USERNAME" --form-entry=main:secondary_password="$PIN$(stoken)" "$VPN_SERVER"
It’s albe to auto connect now !! But there is a problem, OpenConnect will continue retrying when connection failed. Unfortunately, our VPN Token server will lock user after failed a few times.
But this is probably a good solution when we need working on Linux servers.
Idea Three: AnyConnect CLI Solution
@Sam mentioned Cisco AnyConnect App provide CLI tool by its self ! Let’s see.
3.1 Setup Cisco Profile
Create Profile file as @Idea one: Cisco AnyConnect Profile
3.2 Install Stoken
we still need install Stoken mentioned in @2.1 @2.2 @2.3
3.3 Generte response.txt
based on cisco vpn tool, we can provide a response.txt file to auto the connecting process.
/opt/cisco/anyconnect/bin/vpn -h
    Usage: vpn [options] | [cmd] [host]
       options:
            -s         Read commands from response file to work non-interactively.
                       Example: vpn -s < response.txt
That means we need generate this response.txt file first ( response_file.sh ):
#!/bin/bash

token="xxx"$(stoken)
username=xxxx
password=xxxx
second_username=$username

anyconnect_response="Corporate
$username
$password
$second_username
${token}
"
echo "$anyconnect_response" > response.txt
3.4 Connect with Cisco CLI
#!/bin/sh

operation=$1
operation=$(echo "$operation" | tr '[:upper:]' '[:lower:]')

if [[ -z $operation ]]; then
    echo "Please provide your operation: connect | disconnect."
    exit
fi

if [[ "$operation" != "connect" ]] && [[ "$operation" != "disconnect" ]]; then
   echo "VPN operation is: $operation, should be: connect | disconnect."
   exit
fi

vpn_zone=$2
vpn_zone=$(echo "$vpn_zone" | tr '[:lower:]' '[:upper:]')

if [[ "$vpn_zone" != "VPN1" ]] ; then
   echo "VPN zone is $vpn_zone, should be: VPN1."
   exit
fi

if [[ "$operation" = "connect" ]]; then
    sh response_file.sh
    /opt/cisco/anyconnect/bin/vpn -s connect $vpn_zone < response.txt
elif [[ "$operation" = "disconnect" ]]; then
    /opt/cisco/anyconnect/bin/vpn -s disconnect
    anyconnect_app_id=$(pgrep Cisco AnyConnect Secure Mobility Client.app | cat)
    kill "$anyconnect_app_id"
else
    echo "please provide your operation: connect | disconnect."
fi
Cisco CLI is working smoothly ~ Wow ~ that’s One-click … not really one-click, still need go to Terminal and type: **sh vpn_connect.sh **
We can add the script folder to $PATH, that will reduce some work, but any better and lazy way to do it ?
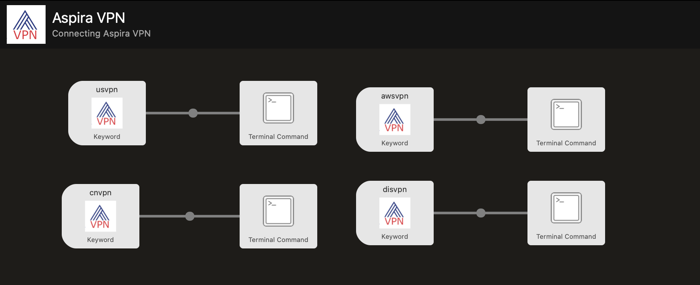
Idea Four: Integrate with Alfred
Sure, we can use Alfred, just setup a simple workflow …
Finally … Quiet and Peace ….
Related Articles:
P.S.
This article is based on Cisco VPN Tool Version 4, after updated to version 5, the application structure has chagned:
- Version 4 named : Cisco AnyConnect
- Version 5 named: Cisco Secure Client
For V5, the profile xml is under:
/opt/cisco/secureclient/vpn/profile/
And CLI tools is under:
/opt/cisco/secureclient/bin/vpn